Author Archives: admin

Winding a PEMF coil

First we have to decide what size of coil we want to create. I’m going to be using enamelled copper wire 0.63mm in diameter, simply because it was easily available at the time.

0.63mm diameter wire is close to the American wire gauge size 22awg. A half kilogram spool of 22awg is about 280 metres.

I’ve made a coil former from a centre core of 60mm diameter, with side cheeks screwed on so that it can be dismantled after winding. In order to prevent the newly wound coil from simply springing apart when dismantling the coil former, I’ve taped string across the core in 4 locations around the former.

Once the coil is wound, this string will be tied to hold the coil together.

What is PEMF

PEMF stands for Pulsed ElectroMagnetic Field. PEMF Therapy is the use of Pulsed Electromagnetic Fields for the treatment of a wide variety of ailments ranging from healing broken bones to depression.

A PEMF therapy device induces microelectric currents into damaged tissues by way of the induction effects of changing magnetic fields on a conductor.

This is basically the way transformers and generators work. a varying magnetic field in the presence of a coil of wire induces a current to flow in the coil of wire. The stronger the magnetic field, and the biigger the coil of wire, the more the current flow.

In PEMF therapy, the conductors are the cells of the body. They aren’t coils of wire, so the induced current is very small. However, this small electric current is enough to reduce swelling, which then promotes natural healing to take place.

Ubuntu Can’t Eject USB stick problem [SOLVED]

Sometimes when I have had a usb memory stick plugged in to transfer photos or other files, I can’t eject the stick using the context menu.

Here’s an easy workaround for this problem:

Open a terminal session and type:

sudo fdisk -l

Enter your password, and it will give you a listing of your disk devices.  You need to find which one is your usb memory stick.  In my case it is /dev/sde1

now type:

sudo umount /dev/sde1

Your sudo access lasts for several minutes, so it won’t ask for your password again, it will return you straight back to the prompt without appearing to do anything. However if you type the same command again it will say:

umount: /dev/sde1: not mounted

Which proves that it was mounted the first time you ran the command.

This workaround won’t stop it from happening again, but it is an easy way of making sure the stick is unmounted before you remove it, and it saves you from potentially losing data


Ubuntu Blank Screen Problem

I have this login problem with my Ubuntu 12.10 installation, and the cure for it is listed here.  It may work for other versions of Ubuntu, but there’s no guarantee.

Workaround for the Ubuntu 12.10 blank screen problem

Sometimes, on waking the computer up from being asleep/screensaver or whatever, all I get is a blank screen.  No desktop icons, no menus, no status bar, nothing.

Here’s how to get around the problem.  Bear in mind that this is not a cure, just a workaround:

Right-click on the desktop and a context menu will pop up with the following options:

Create New Folder
Create New Document
Organise Desktop by Name
Keep Aligned
Paste
Change Desktop Background

Click on the last option: Change Desktop Background, and the System Settings window will open at the Appearance Tab.

Change to All Settings by ckicking All Settings at the top of the window

Now click on Displays in the Hardware section.

Nine times out of ten, this restores the desktop icons and menus and all the other open program windows to normal.

If it doesn’t, press Ctrl-Alt-T to open a root terminal, and type:

sudo reboot

Ubuntu Login Problem

I have this login problem with my Ubuntu 12.10 installation, and the cure for it is listed here.  It may work for other versions of Ubuntu, but there’s no guarantee.

 Workaround for the Ubuntu 12.10 login problem

Sometimes Ubuntu 12.10 won’t let me login.

The graphical login screen appears as normal, but when I type my password and press Enter, the screen goes blank for a second, then goes straight back to the login screen again.

It’s almost as though my password is not being accepted, but I know it’s ok, as I can log into a console with it.

Here’s how to cure it:

Press Ctrl-Alt-F1 and do a console login using your normal username and password, then type:

sudo rm ~/.Xauthority

Enter your password, then press Ctrl-Alt-F7 to return to the graphical login screen.

You should now be able to log in.

Building a Deck

So we decided to build a Deck to extend our front patio area; and this is how it went.  This was more or less a continuation of the Bunker and Hot Tub base construction, and the idea was to build a deck to surround the new hot tub as well as extend the patio out to approximately 5 metres deep by 12 metres long

Hot Tub with Decking

Hot Tub installed, deck to be built around it

Originally, construction of the deck was to be in timber, however, it was decided that constructing it in steel would be cheaper, stronger, and longer lasting.

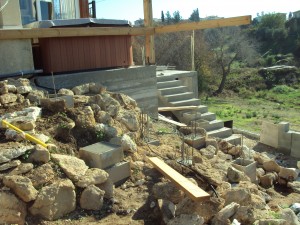
Either way, due to the hilly nature of our plot, concrete pads had to be put in first to support the deck and level it up.  You can see the start of some of the concrete pads in the photo.

Rooting the MK808B

I’ve trolled the internet for days trying to find working instructions for getting a PC to recognise the MK808, installing the correct drivers and finally rooting the MK808.

All of the instructions I have found so far miss out some very important steps.

First of all, download the drivers and unzip to a location you can remember (The drivers I used came with the Rockchip Batch Tool 1.5, and they worked for me).  Download and install moborobo (moborobo also includes drivers and installs them, but you can’t connect with moborobo in the first place if you haven’t already installed the Rockchip driver).  Download TPSparkyRoot and unzip to a location you can remember. Download and install ADB.

Right, having all the downloads in place, you need to get your MK808 connected to your computer and recognised.

Access the Developer option in the MK808’s Settings, and turn on USB debugging.

Disconnect the MK808 USB cable from the power supply, and, using the supplied USB cable, plug the mini-USB end into the OTG port, and get ready to plug the other end into your PC.  Stick a paper clip into the reset button hole, and, as you press the reset button, plug the USB cable into your PC.  (Fiddly I know, but it has to be done)

This is the only way that your PC will recognise the MK808, and it will prompt you for driver installation.  This will fail as Win7 goes to Windows Update for drivers.  Cancel all that and go and find the device in Device Manager and install the driver manually. (If you don’t know how to do that then forget about rooting the MK808 and go and buy a satellite system).

Now there will be a device called RK30 which will not be mounted as a drive but will show up as an unidentified device or something.  Eject the device, power down the MK808 using the power button on your remote and reboot your PC.

Reconnect the MK808 to your PC using the same connection.  The PC will not recognise it, but the MK808 should boot up to the Android desktop.

Run Moborobo.  It will not recognise the MK808.

On the MK808’s Settings dialog, go to the USB option and check the Connect to PC option.  Moborobo will find the MK808 and start installing another driver.  Once complete, Moborobo will give an error message about the device model.  Don’t worry about that, it’s installed the driver as required.

Now run TPSparkyRoot.bat

It will immediately reboot the MK808, with a message to press any key to continue.

DO NOT PRESS any key!  Wait for the MK808 to boot to the Desktop, then go back into the MK808’s Settings dialog, go to the USB option, and re-check the Connect to PC option. (you have to do this at each reboot, as it’s forgotten at shutdown)

Now you can press any key.
TPSparkyRoot.bat will reboot the MK808 3 times.  It is also supposed to install superSU and a couple of others as well but it was written for another device so these installations fail, however the rooting bit works and you can install those things from Google Play anyway once you’re rooted.

Good Luck.
Sunday Breakfast at Capital Coast

On the left, just after the Venus Beach Hotel on Tombs of the Kings road is Capital Coast Resort and Spa.

They offer all you can eat and drink buffet breakfast for 6 Euros per person.  Excellent value, great selection of breakfast foods from cereals, fruits, eggs done any way you want, bacon, sausages, baked beans etc etc.

Doesn’t just apply to Sundays either, it’s any day.  If you want to go every day for a week it’s even cheaper, only 30 Euros.

We didn’t eat a huge amount ourselves, but I had 2 coffees, 2 grapefruit juices, a bowl of Coco Pops and scrambled eggs, toast, a couple of slices of bacon and baked beans.  Anywhere else, that alone would have cost 12 Euros at least.  If you’re a big eater it’s even better value

Sunday Lunch at The Prince

I think it used to be called the Prince of Wales.

This was a few weeks ago, but I’ve been a bit lax.

Excellent food, even better value, as it was BOGOF, Buy One Get One Free, or in other words, 2 for 1.

Either way, Janice & I ate a great Sunday lunch for 12 Euros plus drinks.  We were also in company with Dave & Eve who also had the same deal.

We’ll definitely be back there again.